Photo editing underwater pictures - the basics
9 - adjust depth of field
hopefully to give the main subject ie fish or coral, more 'impact' - so it jumps off the page
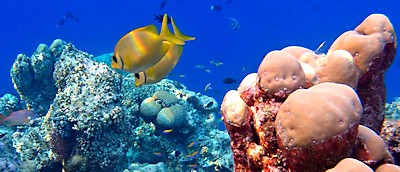


Photo edited without depth of field
Everything above is uniformly in focus. It all looks sharp but flat.You might not use the depth of field tool very often but it's another neat toy to play with. Takes bit of time. It is really useful (vital?) if you are going to print your photograph.
Photo edited with depth of field
With depth of field applied by photo editing, the background is out of focus but the fish and right-hand
coral are in focus.This draws attention to the fish and right-hand coral and the picture is more 3-D and interesting.
What is in focus? Shallow versus extended depth of field
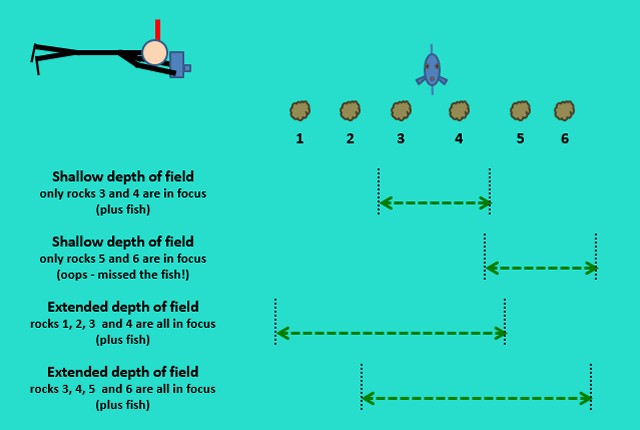
When snorkeling we are moving towards and/ or away from our subject, due to current, surge or just because
we are floating. Often our fish is moving towards and away from us as well.
So, the distance to focus on keeps changing.
To lessen this movement causing blur, as we shoot, the shutter speed is set reasonably fast.
Also, we tend to have the biggest aperture (small f stop number) the light allows, for an extended depth of field. This gives the best chance of the fish being in the sharp focus range, even if the distance to it has changed since we focussed.
But, some photographs look better if the subject only is in focus, and some or all of the surroundings are slightly out of focus.
The subject really stands out. The photo looks far more 3-dimensional and is much more interesting. Photo-editing software to the rescue!
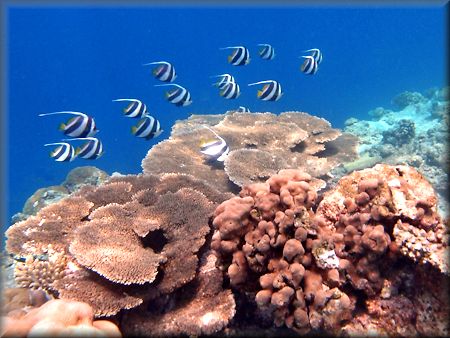
Schooling bannerfish, with extended Depth of Field a lot
in this photo is in focus. We look at the coral quite bit.

with shallow Depth of Field - the foreground coral is no longer
in focus. The fish might look closer and bigger (but they aren't).

How? -
Best to read the 'help' instructions relating to your particular photo editing
software to see how to do this as they all vary a bit.
One way is to draw around your object, (fish or coral) with your cursor. Then dial in some blur outside it. Job done quite quickly.
Another way, which takes more time but gives a better result, is to use a selection tool (in PaintShop Pro it's called a Magic Wand).
One way is to draw around your object, (fish or coral) with your cursor. Then dial in some blur outside it. Job done quite quickly.
Another way, which takes more time but gives a better result, is to use a selection tool (in PaintShop Pro it's called a Magic Wand).
Add a bit of gradient or 'feathering', (perhaps 2 - 4 pixels or so). You don't want an obvious line between
the very sharp and slightly blurred areas.
Then put you selected subject on a new 'layer'.
Sharpen the subject layer and perhaps blur the original layer. Don't overdo it.
Merge the two layers with the sharp fish or coral on top of the slighlty blurred background layer.
Then put you selected subject on a new 'layer'.
Sharpen the subject layer and perhaps blur the original layer. Don't overdo it.
Merge the two layers with the sharp fish or coral on top of the slighlty blurred background layer.
After this photo editing the subject should 'jump off the page' and be the clear
centre of attention, due to it's surroundings being a bit blurred while it is in focus.
centre of attention, due to it's surroundings being a bit blurred while it is in focus.
Strong caution - if two objects are equal distance from the camera, dont make one
sharp and one blurred.
It will look weird. Only objects which are different distances from the camera can be made in and out of focus.
The coral above was closer to the camera than the bannerfish, so could be blurred while the more distant fish are sharp.
It will look weird. Only objects which are different distances from the camera can be made in and out of focus.
The coral above was closer to the camera than the bannerfish, so could be blurred while the more distant fish are sharp.

