Camera - What features mean for snorkeling photography
And, here's why the features are needed
Camera features for snorkeling photography are fairly specific, often differing from scuba photography
3 - Zoom (moderate)
4 - Camera deals effectively with
 white balance
5 - Waterproof housing with easy
access to all the controls
6 - A large sensor
Zoom undoubtedly helps, particularly with 'shy' fish but ...
Too much zoom and I get a photo full of a big, but blurry, fish. You don't need much (I rarely dial in more than 2x).
Higher zoom accentuates your own movements and its very hard to get a nice, sharp, in-focus shot.
Too much zoom and I get a photo full of a big, but blurry, fish. You don't need much (I rarely dial in more than 2x).
Higher zoom accentuates your own movements and its very hard to get a nice, sharp, in-focus shot.

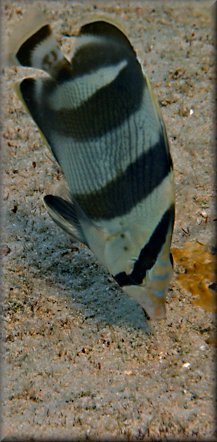
The single factor necessitating a high-end compact - the camera dealing with white balance is a must.
The most suitable camera will have an effective, white balance = 'underwater' setting. This is not the same as an underwater scene or mode setting - beware!!!
A single-click white balance button - accessible via the housing is a less convenient option, but it does work.
Filters are too inconvenient when snorkeling as the depth is constantly changing in the 0 - 5 metre zone changing colour balance.
Photo-editing can't fix a photo with very poor color balance to start with.
Even without gloves, you have a mask on, there may be a bit of current or that fish isn't going to hang around while
you fumble about with your settings so, easy to use!
Housings made for several different types of camera usually fail here.
Housings made by the camera manufacturer or others SPECIFICALLY for one make and model - usually offer easy use of most, if not all of, the controls.
You might decide to use manual controls later so make sure the housing will allow you to do this.
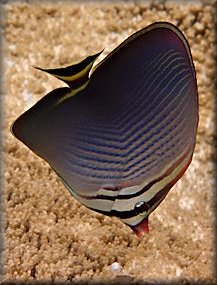
This should mean the camera takes better pictures in low light.
'Better' could be in terms of colour or sharper pictures.
(And underwater, even only a few metres down, we have lower light than on land).
Fish and critters are often under coral overhangs, which removes loads of light.
This can mean the camera needs the help of some flash, even on a beautiful, tropical, sunny day.
7 - A big aperture
8 - Good high ISO performance
10 - Very little shutter time lag
11 - Big clear, bright LCD viewing
screen and shade
A big aperture (hole) lets in loads of light quickly, and light is at a premium underwater - so, we want to use
as much of it as we can.
We can get loads of light by opening the lens aperture (hole) for a long time - but if the fish moves he will appear blurred - so that's no good.
As a big aperture lets lots of light in, even when its only open for a short time - that fish hasn't had time to move. So, he's more likely to be sharp - gotcha.
ISO performance is essentially the same as ASA - a term used in relation to traditional film.
A high ISO allows you to get clearer pictures in relatively dim light.
Use a high ISO (or ASA) with a poor camera and shots in lower light appear to be blurry or grainy so ...
A good performer gives relatively sharp pictures even at high ISO.
In compact digitals good cameras can use up to 400 ISO. Don't be fooled by marketing hype re 3,200 ISO.
If you are making big colour prints though you wont want any 'grain' (so, no high ISO usage for you).
You want the least time lag between pressing the 'shoot' button and the shot being taken.
Otherwise, all is sorted so you press the button and before the camera takes the shot the fish moves - argggh!
Otherwise, all is sorted so you press the button and before the camera takes the shot the fish moves - argggh!
Its surprisingly hard to see through the LCD screen when snorkeling,
especially in tropical sunlight.
The screen often just looks grey so you peer over the top, press the button and hope. Rarely works of course. Not even a fish in the photo or totally out of focus - rubbish.
Initially you will take shots while you are floating around on the surface
but you will soon get bored with that.
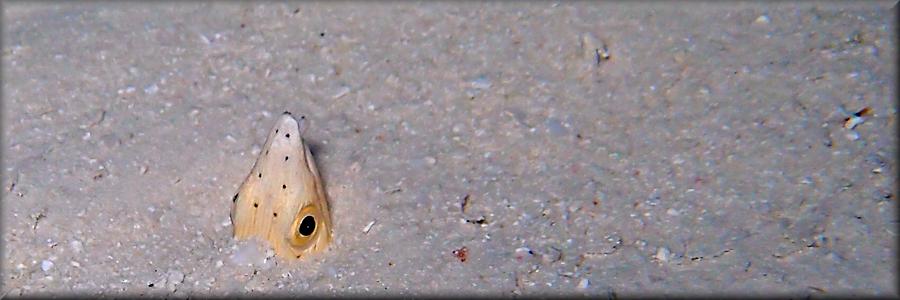
Fish usually show their beauty side on so, you will be diving down and approaching the fish on their level.
They look much better, (are less frightened so you get closer), and your screen will work better.
A good 3" LCD screen is a must and ideally can turn up the brightness.
Essential that screen has a shade.
The screen often just looks grey so you peer over the top, press the button and hope. Rarely works of course. Not even a fish in the photo or totally out of focus - rubbish.
Initially you will take shots while you are floating around on the surface
but you will soon get bored with that.
Fish usually show their beauty side on so, you will be diving down and approaching the fish on their level.
They look much better, (are less frightened so you get closer), and your screen will work better.
A good 3" LCD screen is a must and ideally can turn up the brightness.
Essential that screen has a shade.
12 - Little recharge time/ delay
between shots
13 -Tracking autofocus
(didn't work for me)
14 - RAW image capture
(not used yet)
Lets you take a quick burst of 3 shots
(I tried but no longer use this).
You spend ages finding your fish, getting down, focussing etc. then ...
Often that fish moves just as you take the shot, or shortly after.
So, if your camera will take several quick shots in one burst, before you have to surface, you might think this increases your chances of success.
It didn't for me - especially if shooting close ups. Due to the slight delay between shots, the fish often moved. So, pictures with tails or heads, or sometimes
nothing at all.
Due to the slight delay between shots, the fish often moved. So, pictures with tails or heads, or sometimes
nothing at all.
Taking 1 shot at a time, with 'image preview' turned off, ended up with far more 'in-focus', whole fish shots.
Composure and focus was better.
(I tried but no longer use this).
You spend ages finding your fish, getting down, focussing etc. then ...
Often that fish moves just as you take the shot, or shortly after.
So, if your camera will take several quick shots in one burst, before you have to surface, you might think this increases your chances of success.
It didn't for me - especially if shooting close ups.
Taking 1 shot at a time, with 'image preview' turned off, ended up with far more 'in-focus', whole fish shots.
Composure and focus was better.
Once you have focused on your fish it can move or you can move (both moving are the most likely).
With tracking autofocus the camera adjusts the focus to compensate for any change in distance.
Although this sounds good, in practice it didn't work for me.
Often the fish isn't the most prominent object in the screen so the camera chooses to focus on a rock or some coral.
I've gone back to fixed centre-point focus as there isn't time to choose your focus square in the grid that some cameras have so ...
Tracking autofocus - neat idea but not for me.
Most photo editing software has 'one step photo fix' but ...
If you get into this, RAW image capture is what the pro's use - rather than the more usual jpeg.
Apparently the RAW format works well for software later correcting colour balance.
I've not advanced to RAW mode yet to be honest but I made sure the camera I bought offered RAW-mode shooting in case I do.